A True Test of Precision and Patience
Every great pool player knows that controlling the cue ball is what separates amateurs from champions. While power shots may draw cheers, it’s the soft touch and positional accuracy that win tournaments.
In the June 2023 issue of Billiards Digest, world champion Darren Appleton introduced a powerful yet deceptively simple practice routine called the Triangle to Triangle 9-Ball Pattern Drill — designed to help players develop better cue ball speed, placement, and rhythm.
This drill is not about flashy shots or trick angles; it’s about consistency and smart decision-making. Appleton emphasizes that keeping the cue ball near the center of the table gives players maximum control and shot options. It’s the foundation of solid 9-ball strategy.

Understanding the Triangle to Triangle Drill
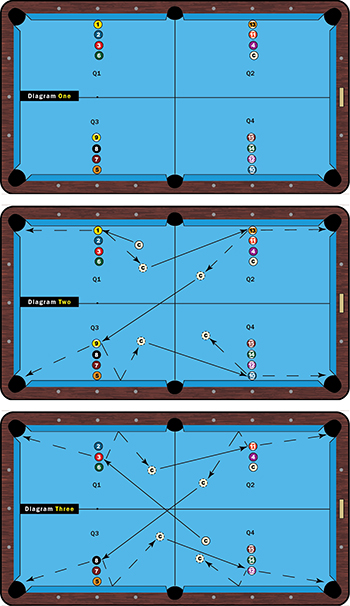
The Triangle to Triangle drill takes its name from the way the balls are racked and played. You begin with a standard 9-ball rack and play each ball in rotation — 1 through 9 — without bumping into other balls.
Starting with cue ball in hand, your goal is to keep control of both cue ball speed and position throughout the run.
For beginners, there’s no need to contact a rail after every shot. But for advanced players, Appleton sets a stricter rule: the cue ball must hit at least one rail on each shot. This forces you to learn how the cue ball reacts to different spins, speeds, and table conditions.
The key takeaway? Every shot should be purposeful, with the next two or three balls already in mind — just like a chess game on green felt.

Step-by-Step Breakdown of Appleton’s Method
1. Opening with the 1 Ball
Appleton recommends starting with a half-ball angle on the 1. Use a touch of high right English to send the cue ball two rails between the 3 and 7 balls, setting up a clean look on the 2.
This shot builds rhythm and establishes the importance of table mapping — knowing where the cue ball will end up before you even strike.
2. Transitioning to the 2 and 3 Balls
Ideally, your position on the 2 should mirror your setup for the 1. Again, Appleton plays two rails between the 4 and 8 balls, leaving the cue ball in a window between the 5 and 9 for the 3.
The idea is to maintain the same tempo — smooth follow-through, no sudden power. This consistency reduces tension and boosts confidence.
3. The Middle Game: 4 to 6 Balls
Here’s where many players struggle. As fatigue or nerves kick in, strokes get quicker and less controlled. Appleton warns against over-hitting: “Just let the cue ball do the work.”
On the 5 ball, use a touch of left English to open the angle for the 6. Then, on the 6 ball, switch to a half-tip of right English to carry the cue ball further for the 7. The challenge is maintaining your line without scratching in the side pocket — a detail that separates advanced players from casual ones.
4. Handling Pressure on the 7 and 8 Balls
By the 7 ball, nerves often start to creep in. It’s a sharper cut, requiring trust in your stroke. Appleton advises repetition: “Shoot it again if you miss. Build the feel.”
Once you’re on the 8, there are two positional routes:
– A two-rail route, which gives better speed control and a more natural line.
– A one-rail route, which requires more touch and carries slightly more risk.
Appleton prefers two rails with heavy left spin, allowing the cue ball to brush the rail near the side pocket before returning toward position — a move top professionals execute with precision.
5. Finishing Strong on the 9 Ball
For the final shot, Appleton keeps it simple. Using high cue ball and right English, he takes a two-rail approach to slow the cue ball naturally into position.
By maintaining control and avoiding unnecessary force, you build the muscle memory that wins games under pressure.

Why This Drill Works
The Triangle to Triangle drill teaches multiple advanced principles in one exercise:
-
Cue Ball Speed Control: Understanding how English and follow-through affect travel distance.
-
Positional Awareness: Learning to leave ideal angles for the next shot.
-
Table Feel: Using rails to gauge table speed and spin response.
-
Mental Focus: Training under “no-error” conditions that simulate real match pressure.
Appleton’s emphasis on rhythm and light touch mirrors what top pros practice daily. “Leaving nice angles and sticking to a good rhythm,” he explains, “makes this a great pattern drill for everyone.”
Building Confidence and Consistency
Beyond mechanics, this routine builds confidence — the kind of quiet assurance every player needs under bright tournament lights. It teaches patience, foresight, and an understanding that success in billiards isn’t about raw power but precise control.
The best part? You don’t need a fancy table or custom cue to start. Just rack the balls, visualize the triangle pattern, and commit to finishing every run — no matter how many resets it takes.
The more you repeat it, the more you’ll internalize the core lesson: center table is power. Every time your cue ball stops in the middle of the cloth, you’ve earned flexibility, balance, and command of the game.
Conclusion
Darren Appleton’s “Triangle to Triangle” drill is more than a practice routine — it’s a philosophy of cue ball mastery. Whether you’re a beginner learning to control speed or an advanced competitor refining your angles, this exercise builds the habits that define world-class play.
Take your time. Feel every shot. Learn from every miss. Because, as Appleton reminds players, next month’s version won’t be so easy.
Sources:
– Billiards Digest — “Perfect Practice with Darren Appleton: Triangle to Triangle” (June 2023)
– Darren Appleton, WPA World 9-Ball Champion, professional instructional features.

